


Opinion
Using AWS Device Advisor for IoT Device Testing
Published on 25 Jul, 2023 by Sam
Overview
AWS Device Advisor is the solution to connectivity testing for IoT devices looking to integrate with the AWS ecosystem. Device Advisor aims to provide a test suite for validating whether your Thing behaves correctly when connecting to AWS IoT Core and to validate how it handles edge cases such as intermittent connectivity or when receiving abnormally sized payloads from the cloud.
Before we get started though, note that your device won’t be able to communicate with anything beyond Device Advisor itself. This means that if you’re relying on, for example, IoT Rules to route some information to Lambda and back again, then expect that to get no response at all! Your device is effectively isolated from the rest of AWS during the test suites.
Available Tests
Device Advisor makes a number of tests available to you that can be combined into a test suite that can then be run against a Thing that has been registered with IoT Core. There is also some customisability available for some of the tests. As a brief overview of what’s available though, we have the following tests:
- TLS connections
- Checking connection success, supported cypher suites, larger server certificates, rejection of insecure server certs, and rejection of expired server certs.
- MQTT communications
- Connecting, disconnecting, reconnecting, publishing to a channel, subscribing to a channel, checking whether the device disconnects when it doesn’t get a response (keep-alive tests), and checking that a device can resume a persistent session that it got disconnected from.
- IoT Shadow tests
- Publishing to, and updating a shadow to a desired state
- Job execution tests
- Tests that the device receives a job and returns a message to the appropriate topic
- Permissions and policies
- Ensuring that the policies attached to the device’s certificate don’t contain wildcards and that they “follow best practices”.
- Long duration tests
- Return a response on QoS 1 subscriptions
- Receiving and handling large payloads
- Persistent sessions (extends the tests supported in the MQTT category above)
- Full-length testing of the keep-alive system
- Intermittent connectivity to test sudden connection drops
- Reconnection backoff to make sure the device increases the gap between its connection attempts when they fail
- Long server disconnection (ensuring the device will reconnect after a long period of connection downtime. To provide some context for how long the disconnect is, the default is 120 minutes and that is also the maximum)
Making your first test suite
1. First things first, ensure you’re in a region where Device Advisor is enabled. It’s enabled in us-east-1, us-east-2, ap-northeast-1, and eu-west-1. Then head to IoT Core, and the Device Advisor should be sat in the navbar to the left of the screen. Then hit “Test suites” in the nav, and then “Create test suite” to the right of the screen.
2. Next up is to decide what sort of test suite you’re going for. It’ll probably be a “long duration test suite” or a “custom test suite” unless you’re explicitly looking to validate your Thing for the AWS Device Qualification, in which case you’d use the “AWS IoT Core qualification test suite”. While you’re there, select the protocol that your Thing uses when connecting to AWS IoT Core as that’ll be what Device Advisor then expects for the connection.

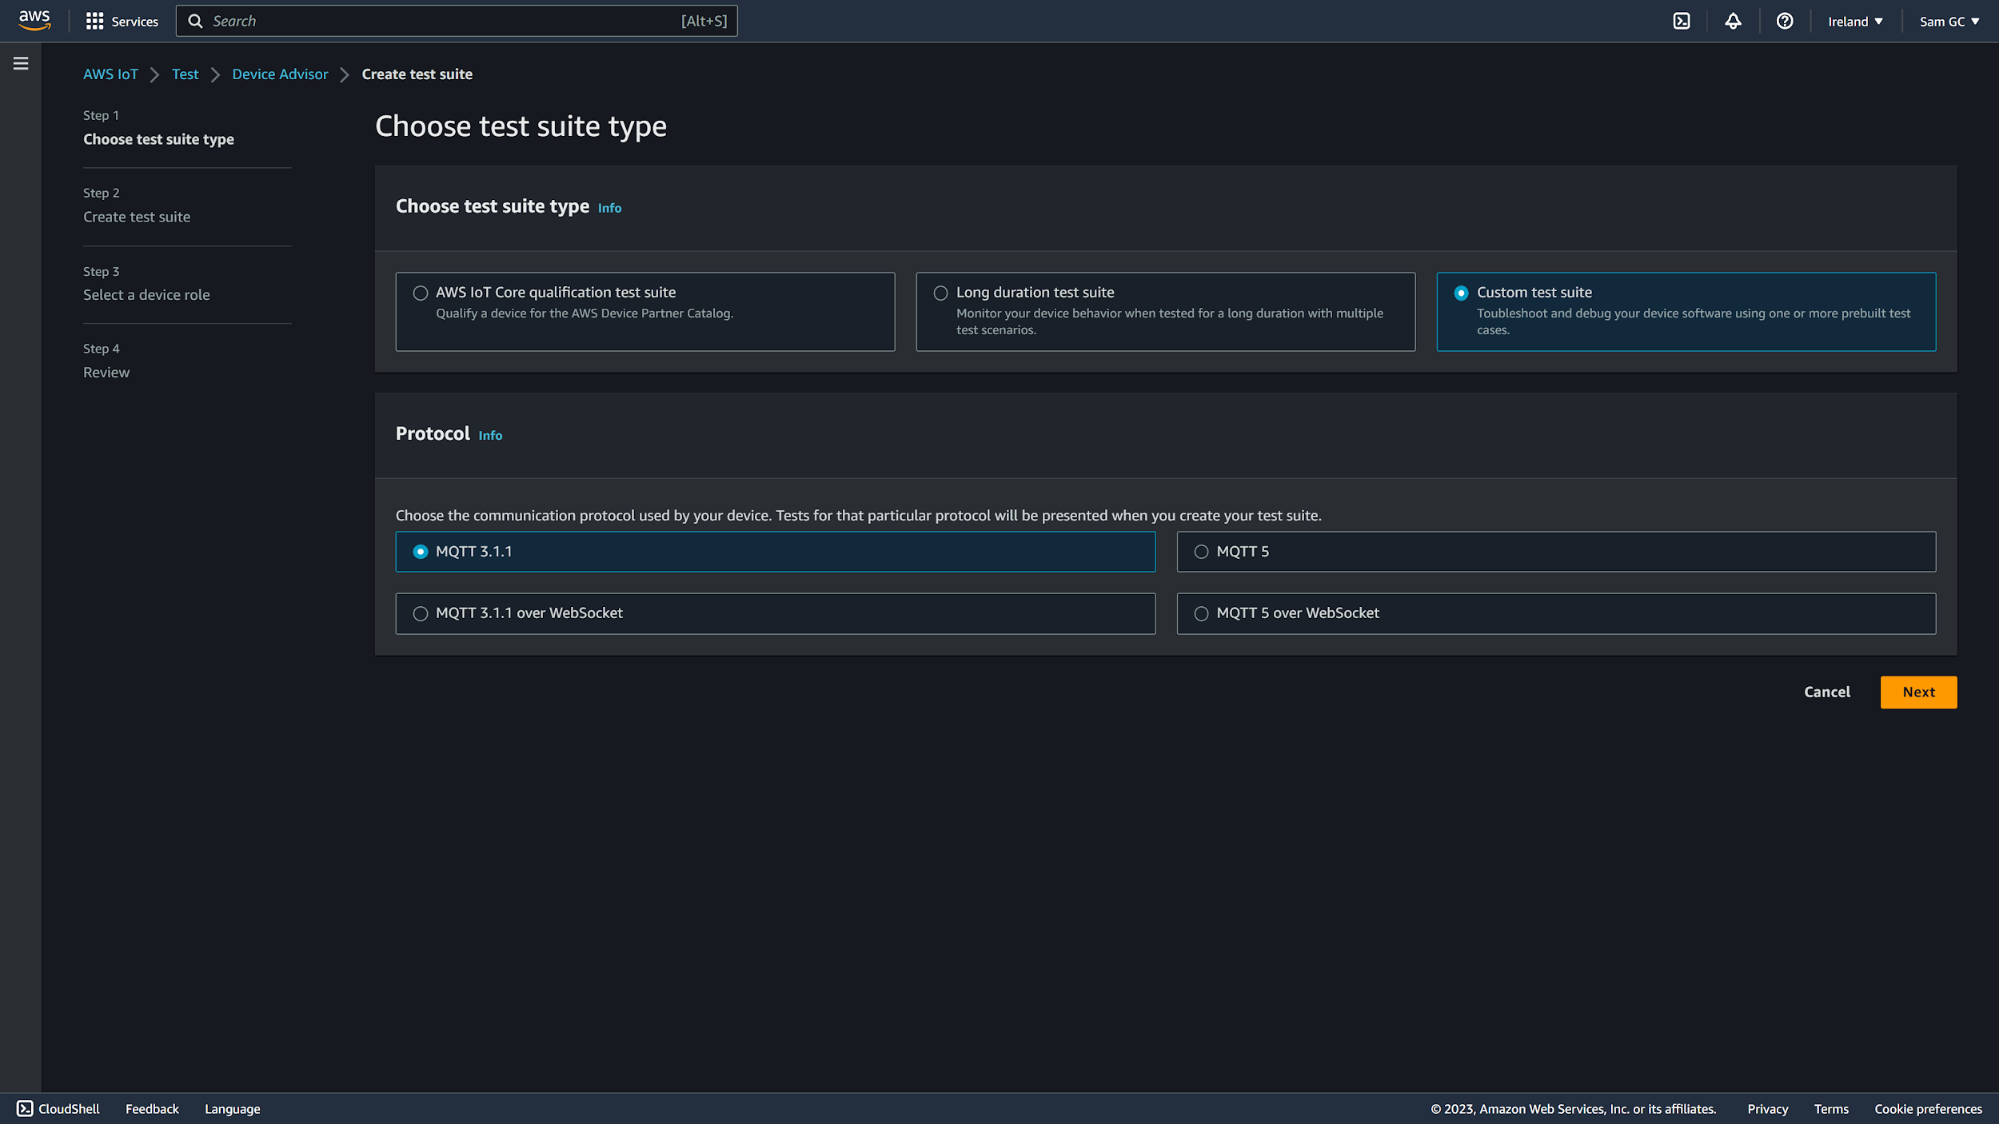
If you’re creating a long-duration test suite, you get a standard set of tests and then you can select which of the long-duration tests you want to run, as well as configure the ones that come with configurable options. We’ll be creating a custom test suite for this example here so ensure that “Custom test suite” is selected, that you’ve got the right protocol highlighted, and then click “Next”.
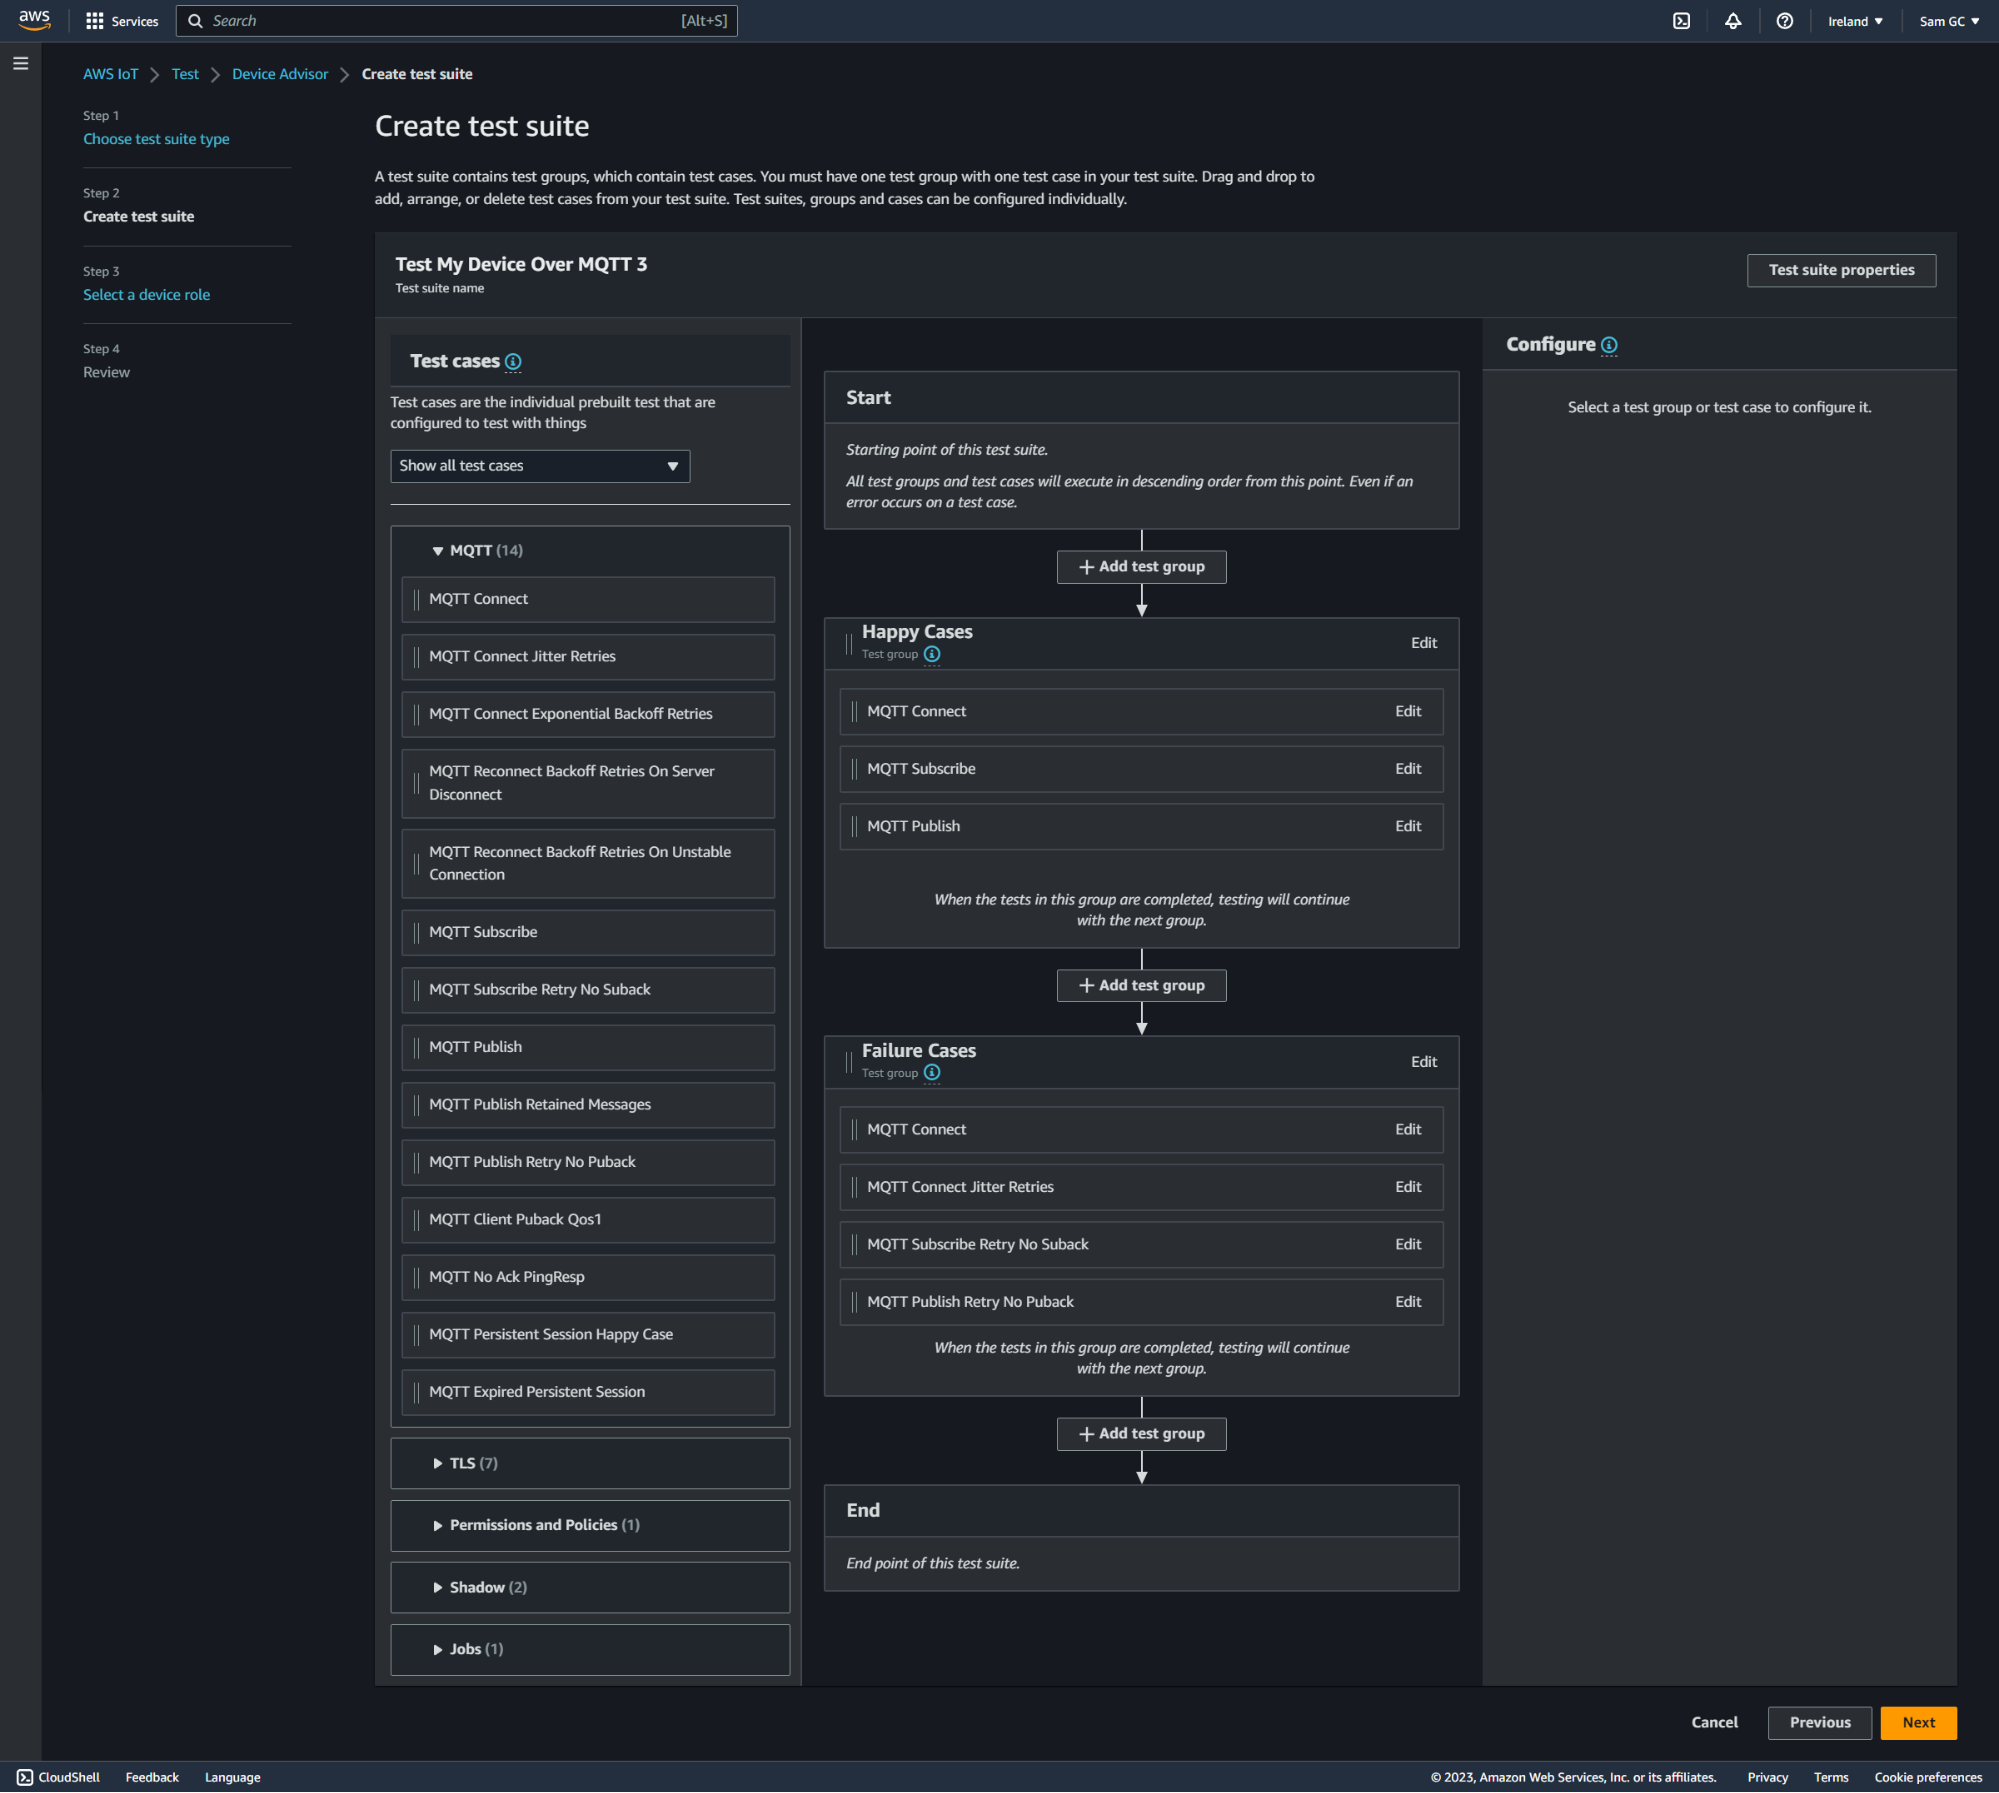
3. You should now have a blank test suite ready for adding tests to. The name and timeout can be edited by clicking “Test suite properties” and test groups can be added and removed as required.
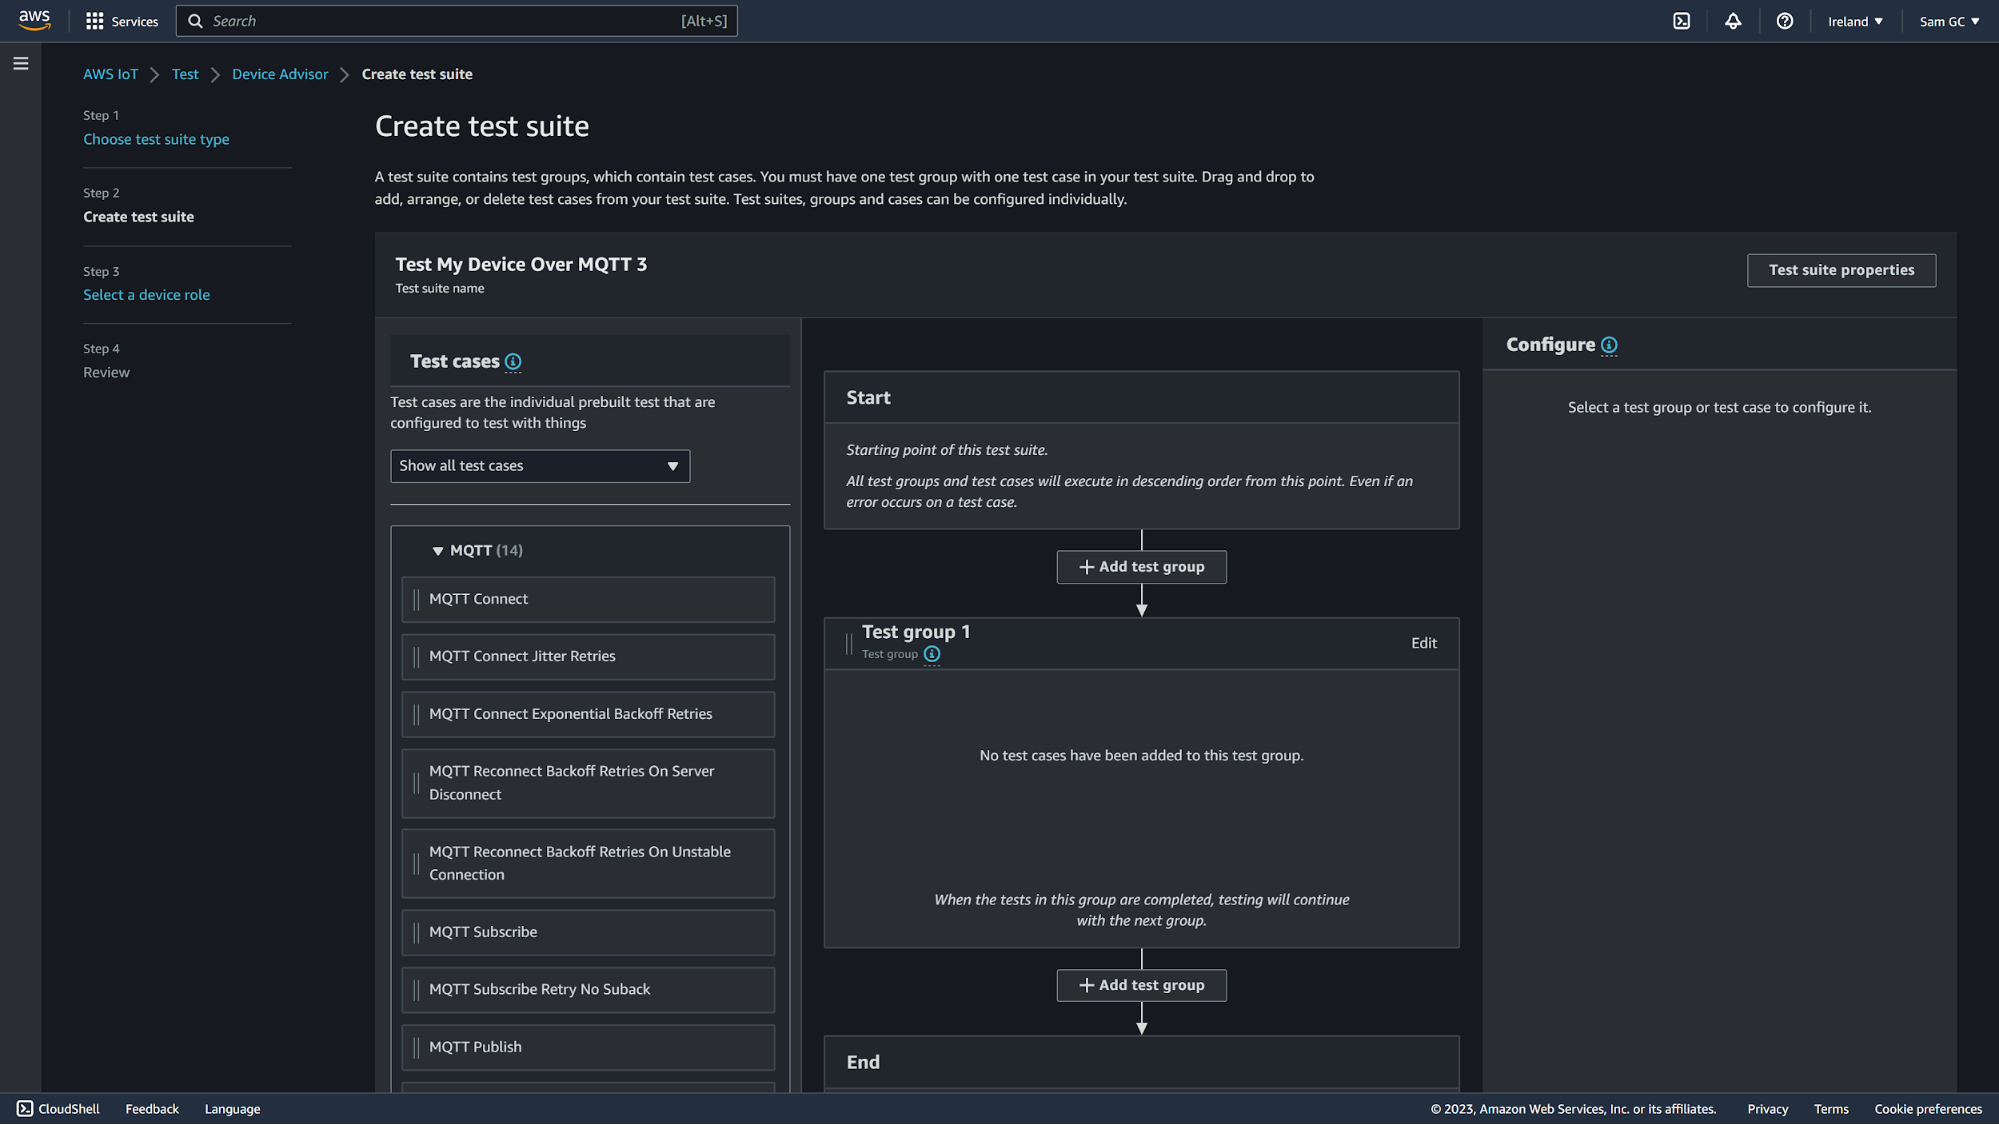
4. Time to drag tests in! Add the cases you’re looking to test and edit their properties as desired. You can split them over multiple test groups, and each test group can be renamed to make it easier to identify and can have an optional timeout set. Once your tests are looking in good shape, hit next and we’ll set up the IAM role that Device Advisor is going to use.

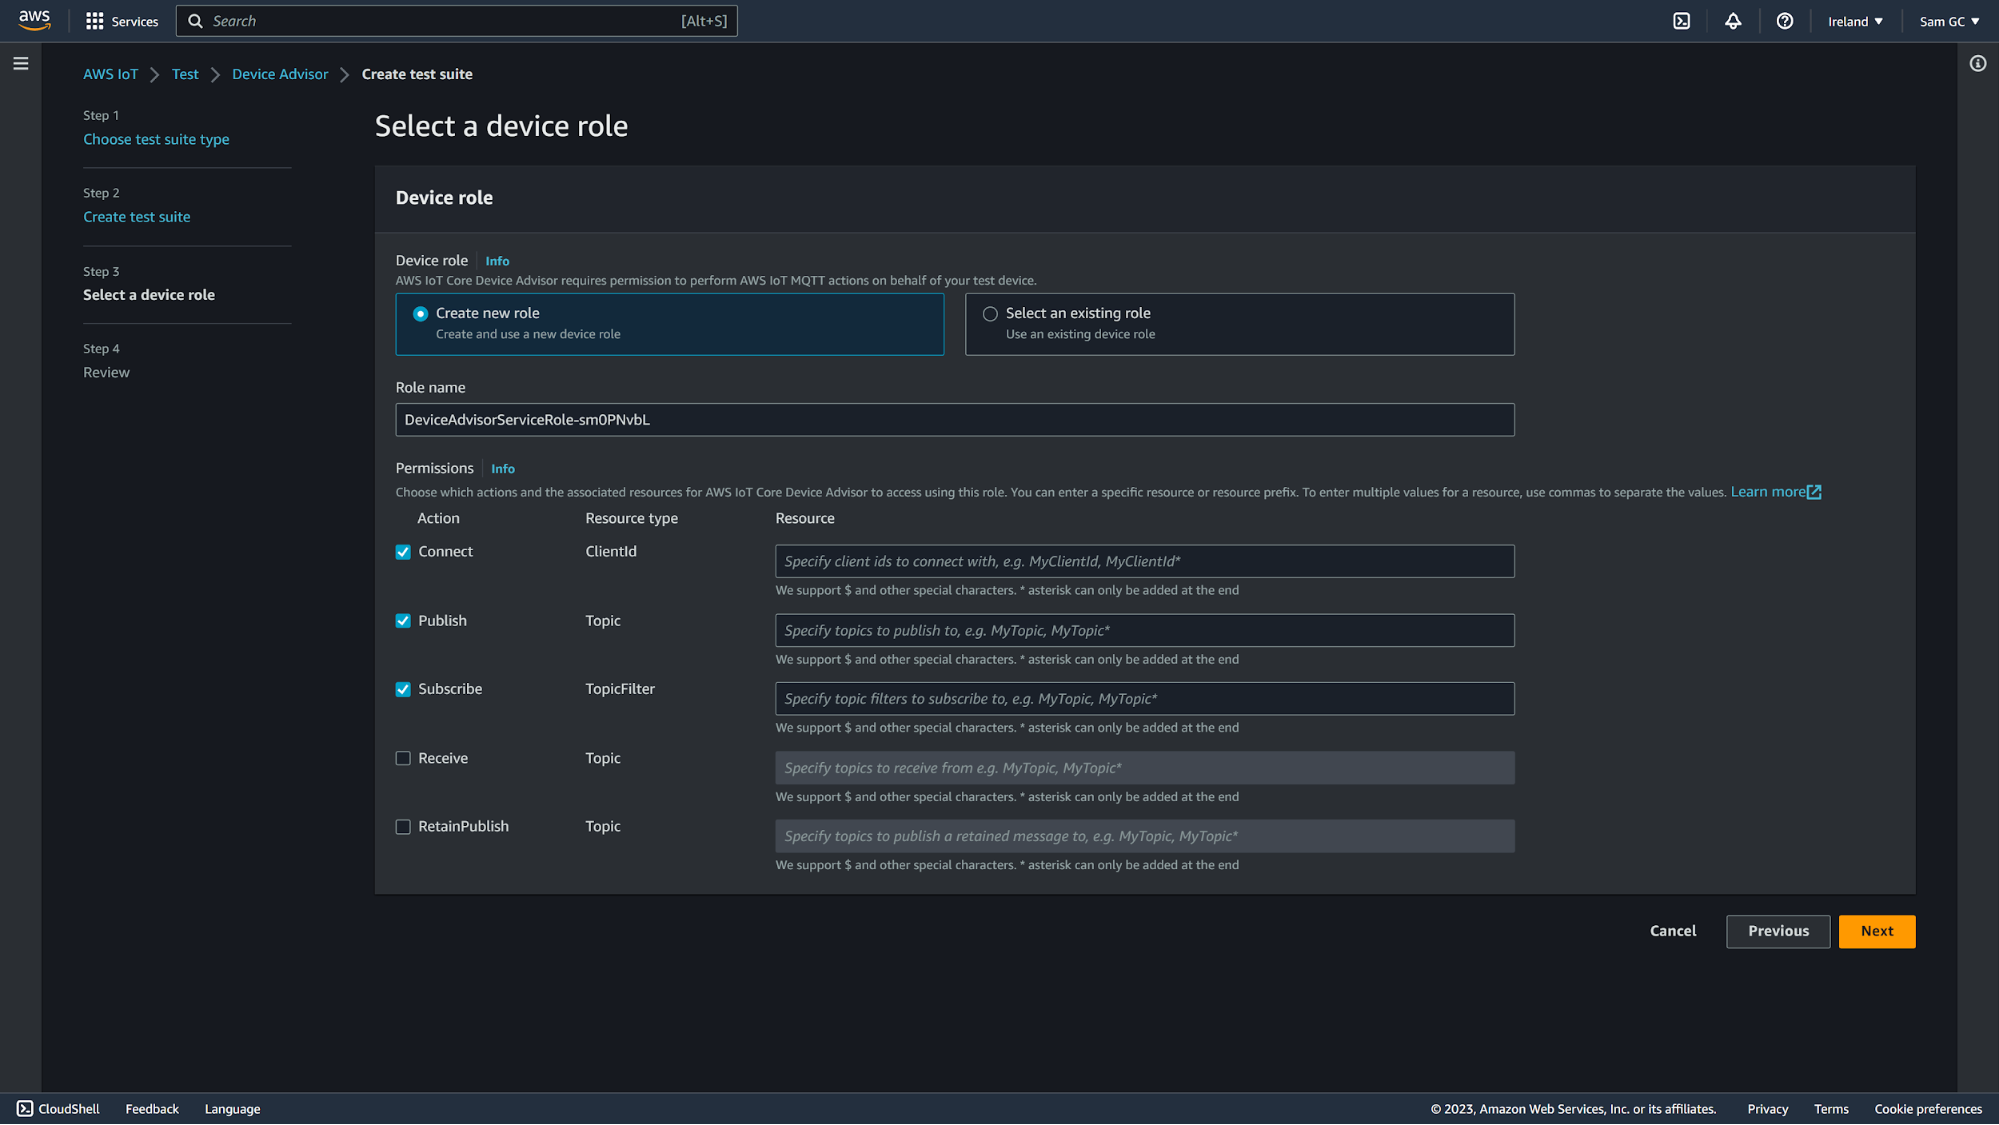
5. Fill in your new role as required, or if you’ve already got a role setup (either via the console, CLI, or CloudFormation) then you can select “Select an existing role” and then search for it from the dropdown that appears.
If you are creating a new role, you’ll need to fill in the client ID of the device that will be connecting to Device Advisor, the topics that the Thing can publish to, and the topic filters for the list of topics that the Thing can subscribe to. Then hit “next”.
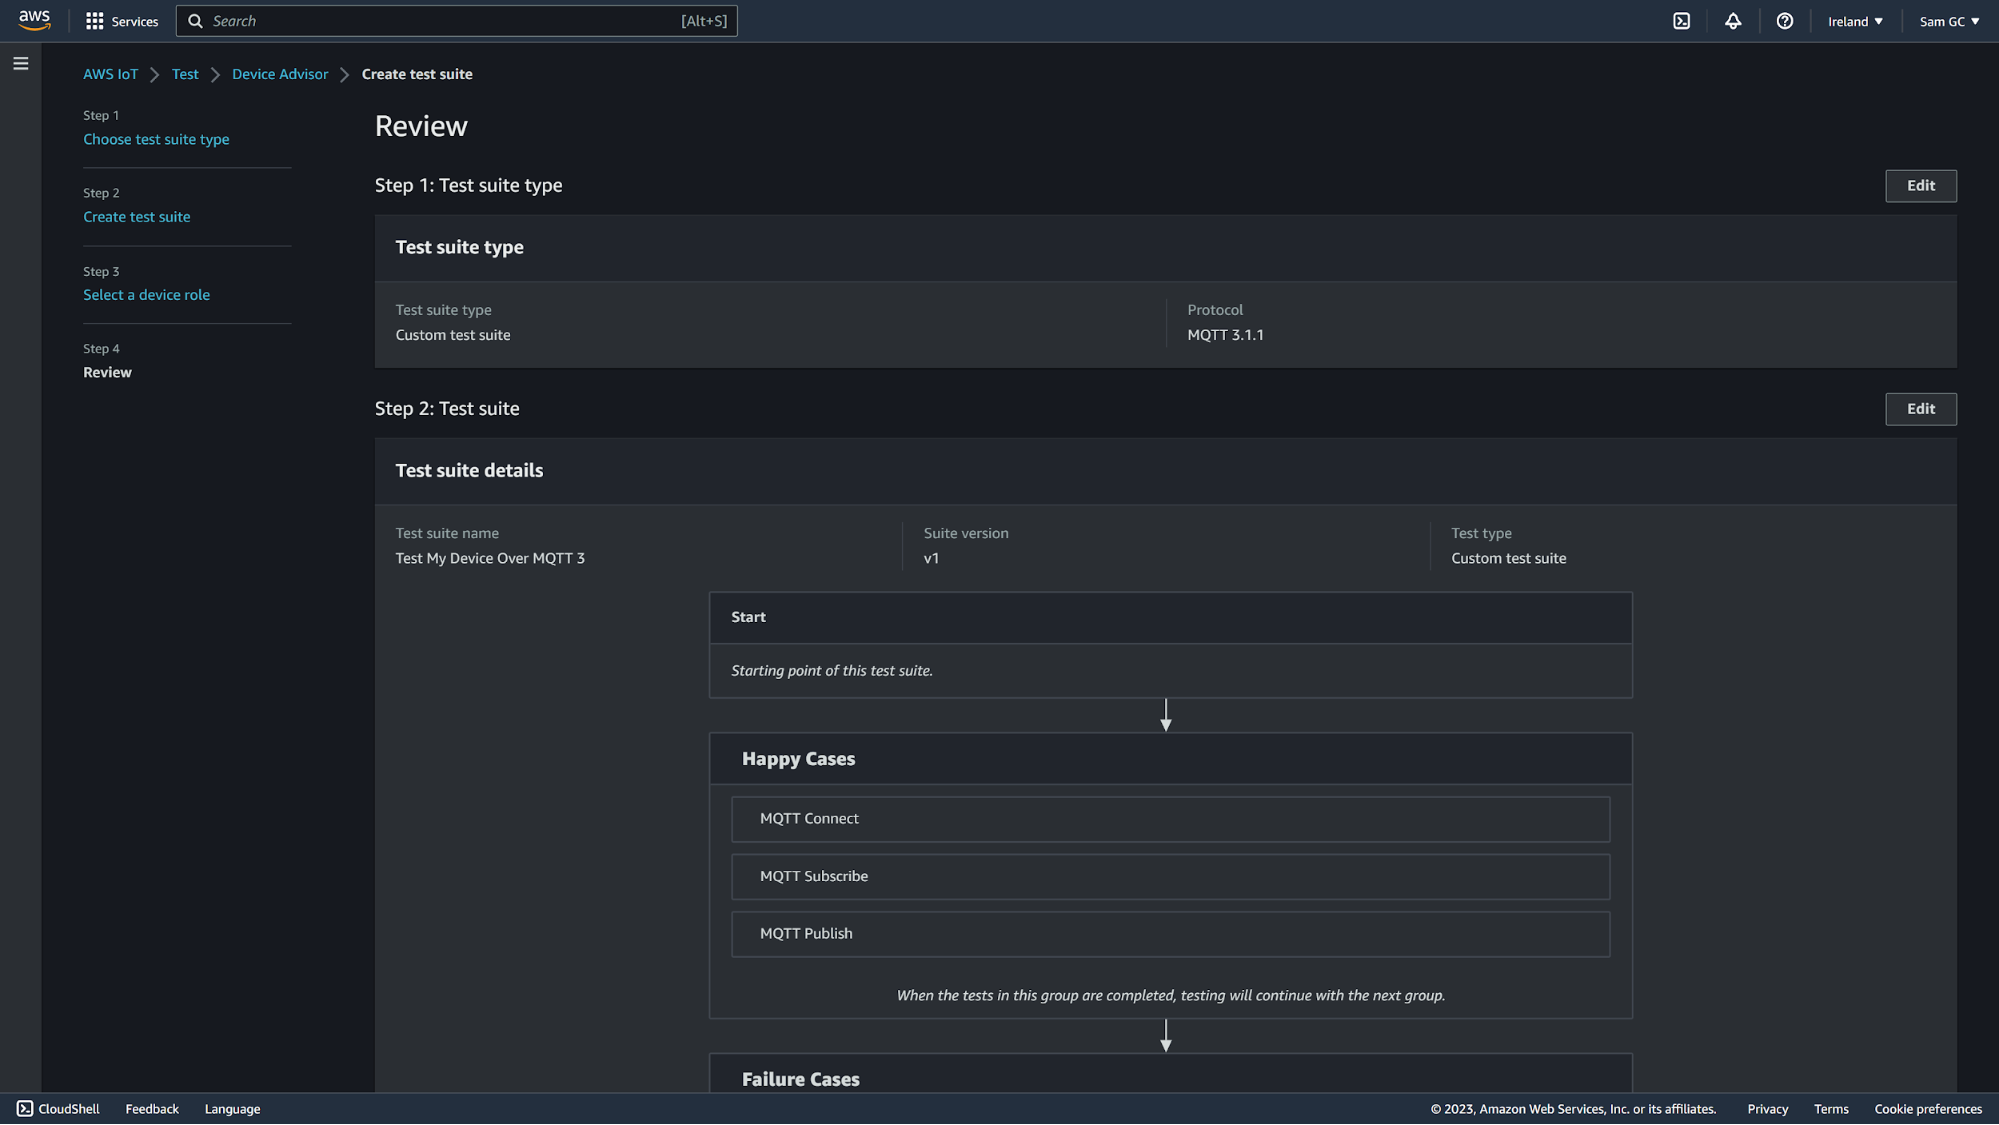
6. Final stage of making your first test suite! Have a look over everything during the review step and make sure it’s as you want it. Then hit “Create test suite”. The green banner at the top of the screen should appear and let you know that it has been created successfully and the next step is to click the newly created suite in preparation for running it for the first time.
Running your new test suite
So you’ve got your shiny new test suite and it’s ready to be set loose to do some automated testing. Let's run through how that’s done:
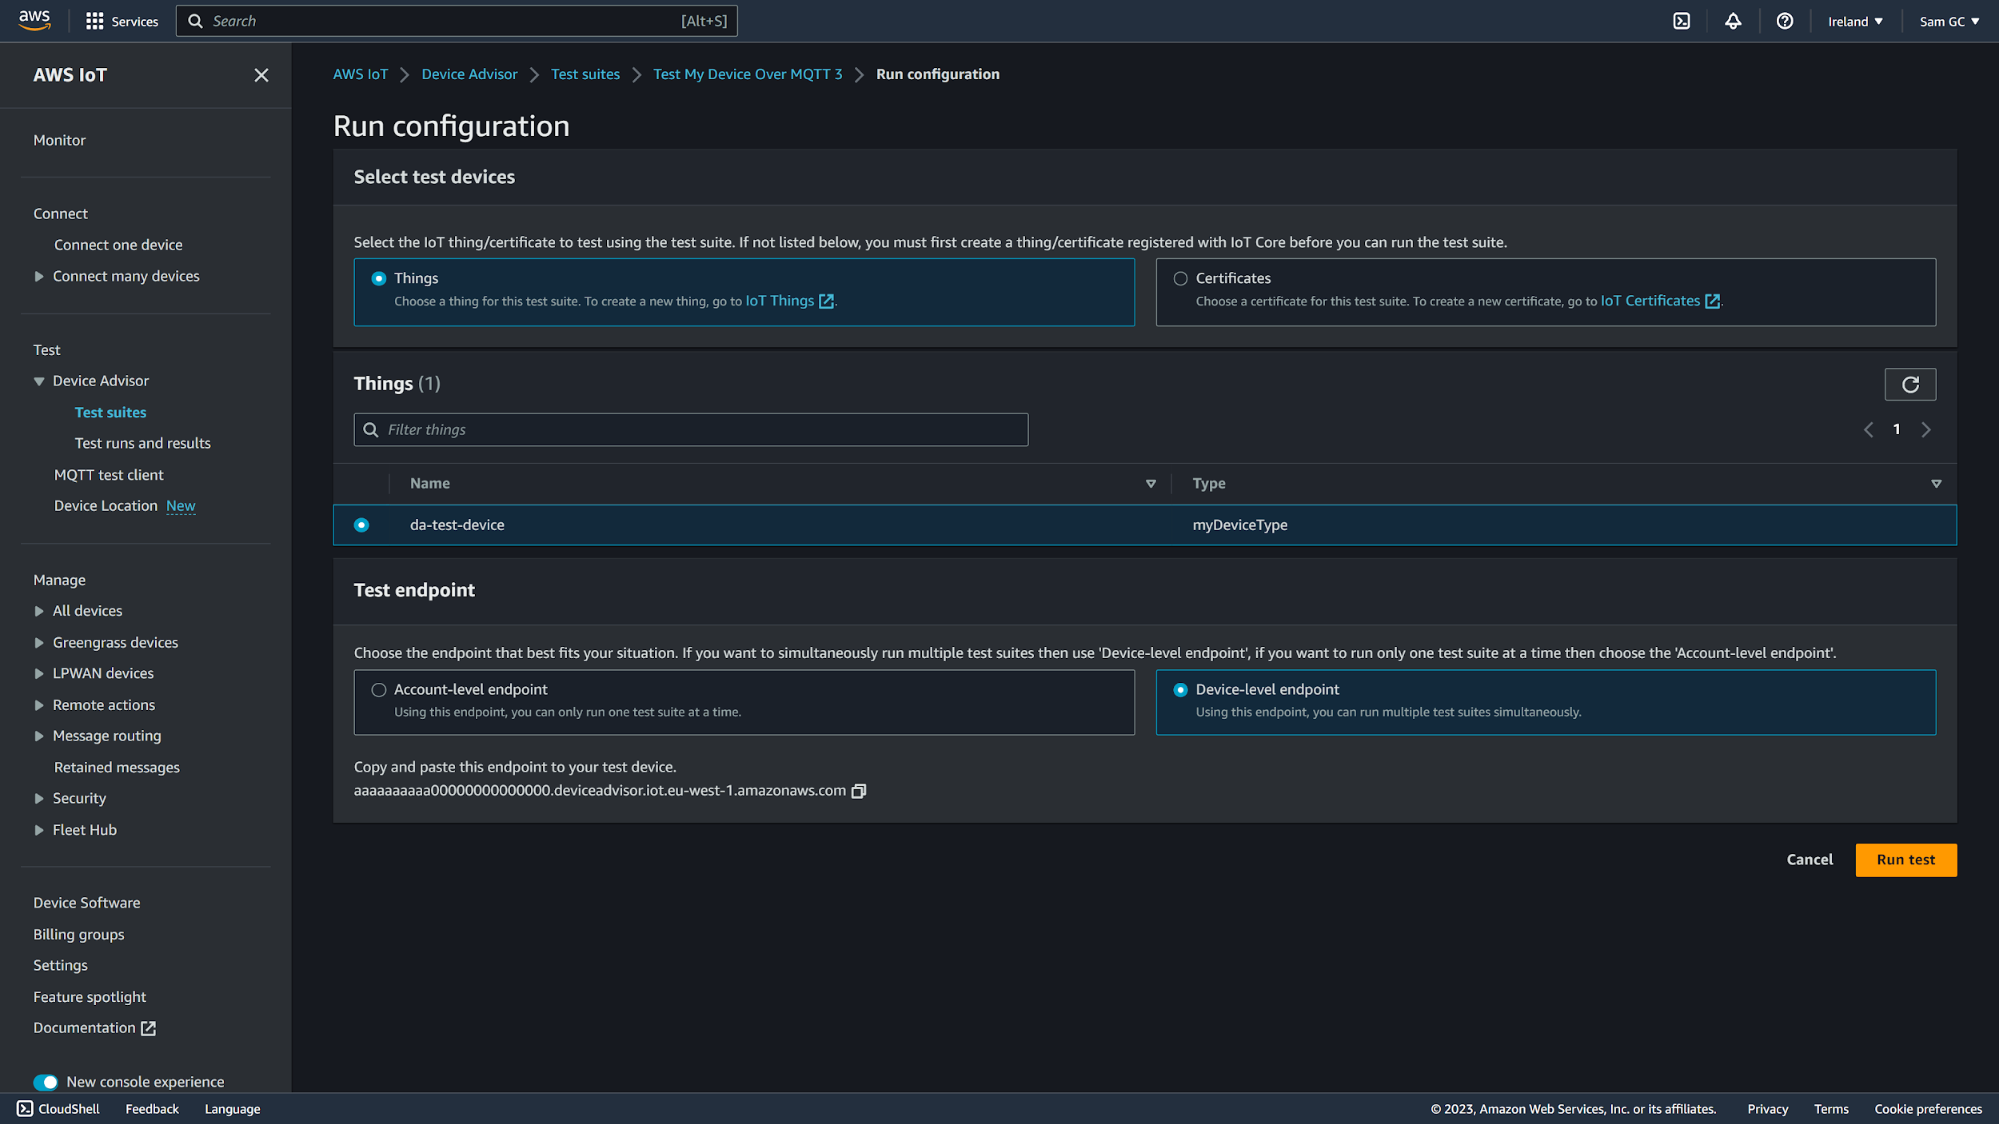
1. From the overview screen you’re looking at, click “Actions” and then click “Run test suite”. From here, select whether you’re testing against a specific Thing, or whether you’re testing against a specific certificate. For this walkthrough, we’re going to test against a Thing, so we select that we’re testing against “Things” and then we select the Thing we’re testing against (“da-test-device” in this case). After that, we select “Device-level endpoint” rather than “Account-level endpoint” so we avoid facing the issue with an account-level endpoint where we can only run a single test suite that’s making use of the account-level endpoint (i.e. you can’t run 2 test suites at the same when both are set to use the account-level endpoint).
It's worth noting here that the endpoint is tied to the certificate that the Thing uses, or the certificate you’ve selected when testing against “Certificates” rather than “Things”. This continues between different test suites, so providing the Thing you’re testing uses the same certificate, or if you're testing against certificates and are using the same certificate, you’ll have the same endpoint.
Now that’s sorted, copy the endpoint, click “Run test”, then click the “Go to results” button on the banner at the top, and finally, click your newly created test suite run!
2. Once that’s running connect your device to the endpoint you copied at the end of and make sure you’re using the certificate that device is configured to use on AWS. The next step is to wait for it to complete!
Understanding the results
So you’ve run your test suite, and you’ve gotten the results, but what do they mean? Fortunately, Device Advisor makes it easy to understand the results at a glance, and easy to view the CloudWatch logs when it comes to digging into issues further. Tests that failed are shown with red text and the result is worded as such. Tests that passed have the result in green and are also worded as such.
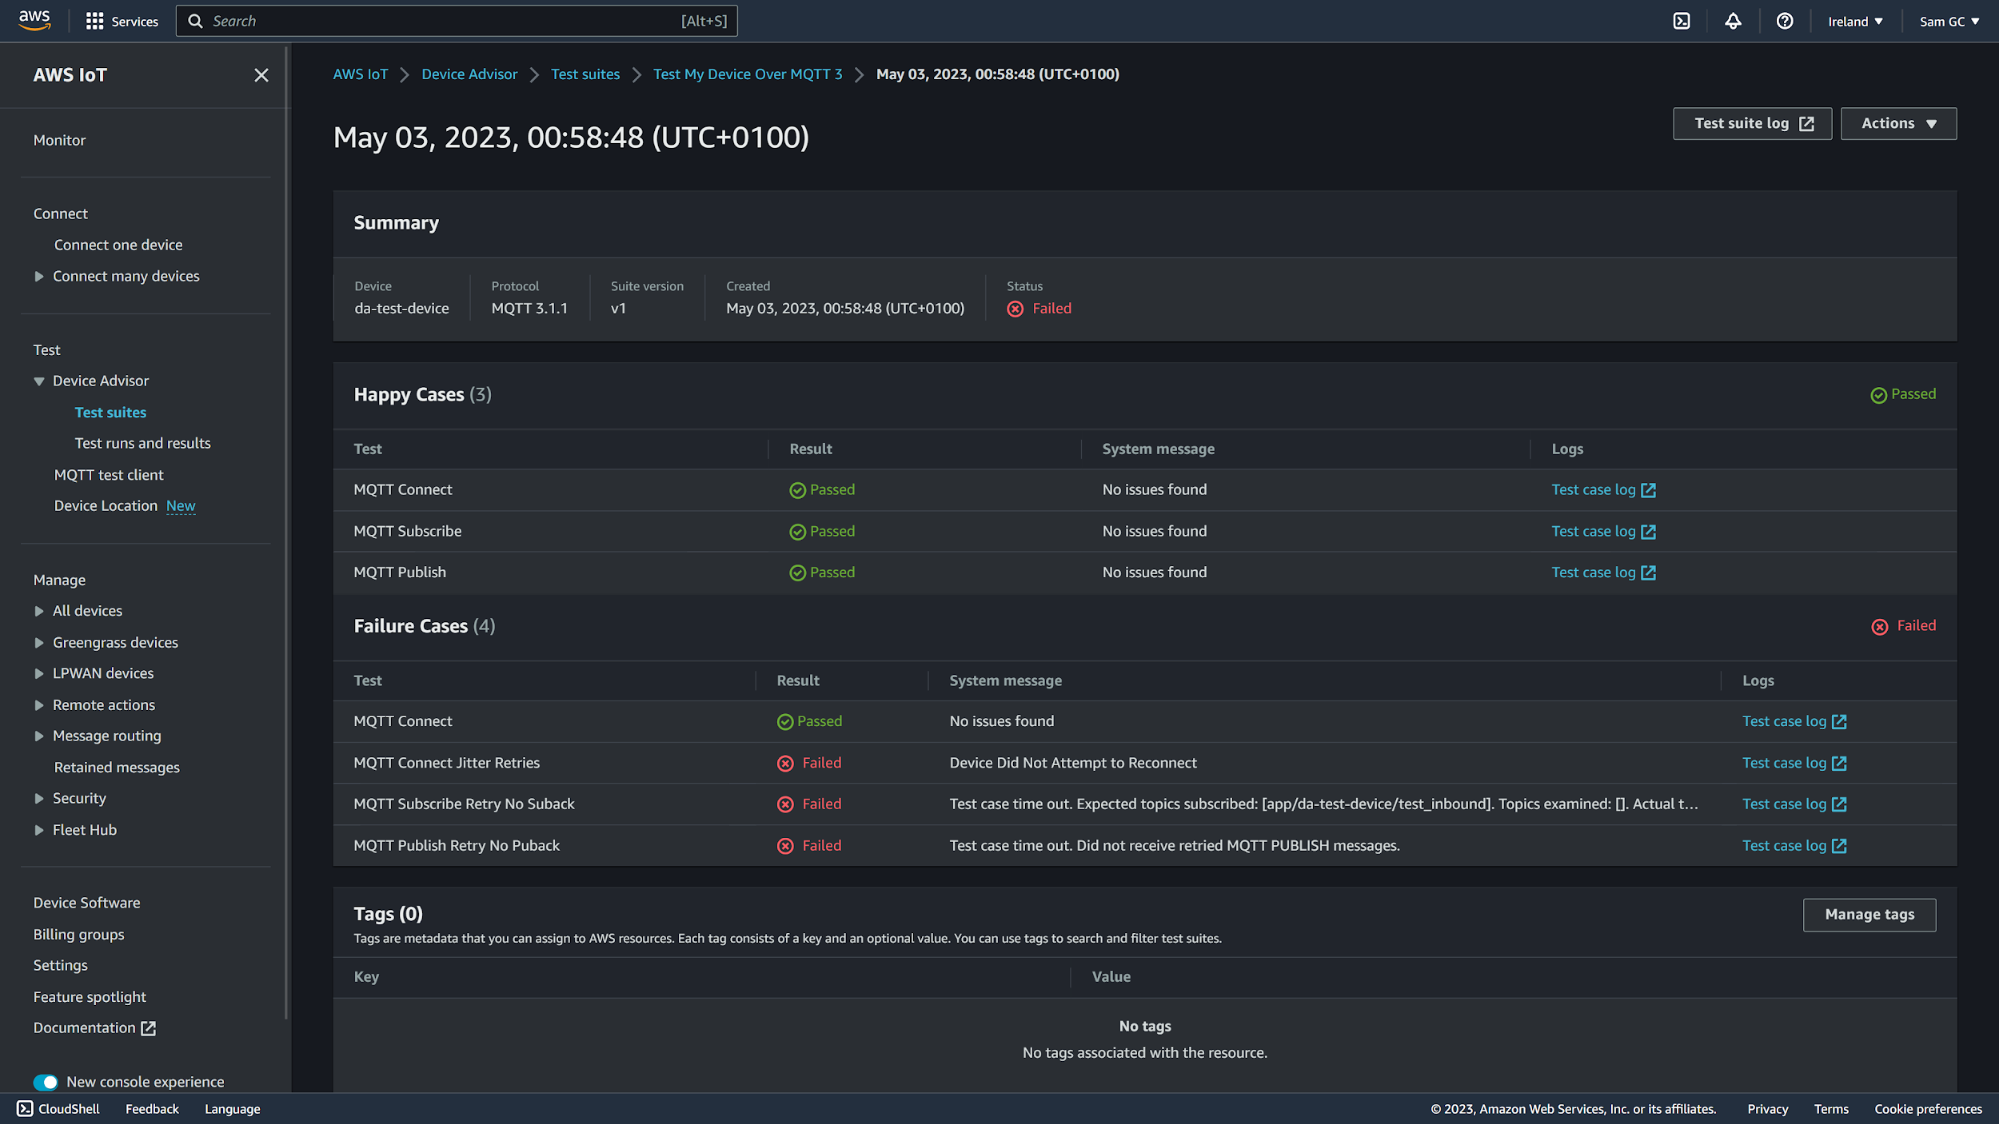
If a test does fail, the “System message” column will have an explanation of what occurred for Device Advisor to think that the test has failed in some way. If the short summary doesn’t provide enough detail, you can also dig into the CloudWatch logs by clicking “Test case log” to the right of the summary message. There, you can find logs of all the data that Device Advisor received during the test suite.